Chances are you’ve probably wondered how your computer was made. It’s actually not as mysterious a process as you might think! There are eight main components that work in sync with each-other to let you play video-games, watch YouTube, or even read this article.
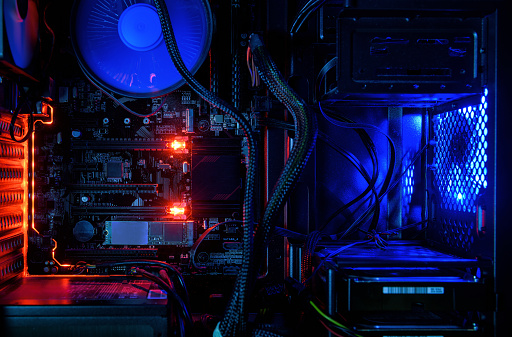
When looking at the parts of a computer, they can look scary, but I assure you they’re fairly interesting! The part of the computer responsible for a majority of the thinking and processing is called the Central Processing Unit (CPU). The CPU will often offload visual processing to the Graphics Processing Unit (GPU) which is the large rectangle in the middle of the desktop – whenever your computer is running a videogame, it will be using this component. Data collected by the computer is placed into the Random Access Memory sticks (RAM). These sticks will store temporary data like the content of your google tabs or pieces of writing that you haven’t saved to a hard-drive yet. The CPU, GPU, and RAM are all located on the Motherboard, often abbreviated as MoB, which works as the glue that holds everything together. It is the road through which each processor can send and receive information.
Long term storage can take three main forms at the moment: Hard-drive, Solid State Drive (SSD), and m.2s. Depending on the type of storage, it may go on the motherboard (m.2) or in a separate compartment (HDDs and SSDs). The enclosure that stores the components of a computer is called the chassis. These can often be the cheapest part of your build. Perhaps the most important part is the cooling system. You can have a water cooler or air cooler set up to keep the CPU from overheating. In addition to those, you may also have other fans placed into the chassis. The last part of a computer is the most obvious one. The Power Supply Unit (often referred to as a PSU) is, usually, at the base of the chassis, below everything else. Wires will connect this part to everything else in the computer and can be considered the heart where the CPU is the brain.
Of course, we know that these parts can operate at different levels of efficiency. Not everyone will want the same parts. Someone who just enjoys searching the web won’t need any excellent parts and as such can go for cheaper options. A graphic designer or 3-D modeler will need the best GPU available. A gamer will need a good GPU, good RAM, and a good CPU all working in cohesion. If you are interested in making your own computer, you need to ask yourself “What am I going to use this for?”
Making the Computer
The CPU
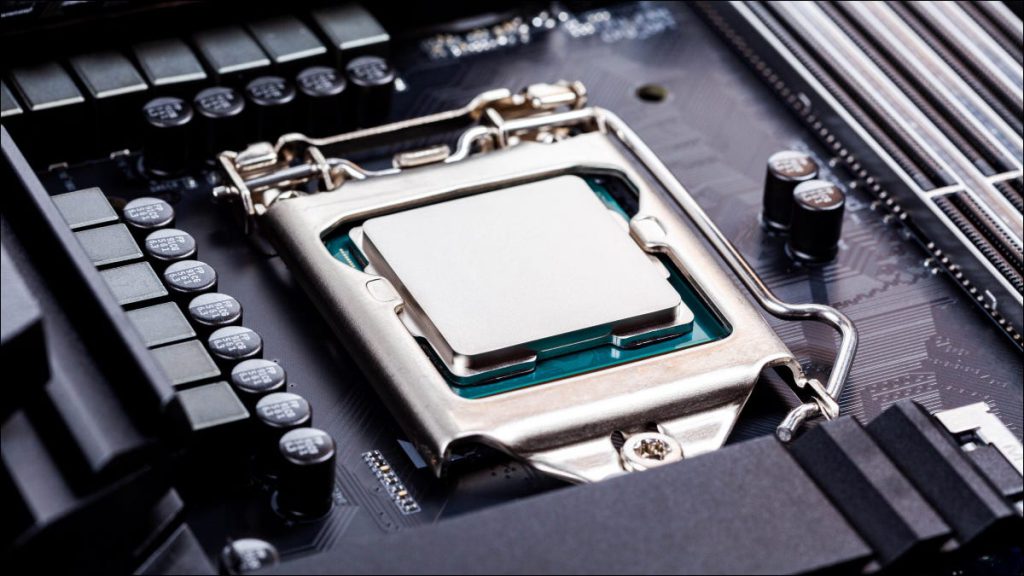
The first thing you’ll need to do when building a computer is place your CPU into the Motherboard. Different Motherboards will have different specifics, but, there’ll usually be a cap on a part of the motherboard near the top left. Next to this cap is a lever. When you pull up the lever and remove the cap, there’ll be a slot with many pinholes (refer to the image below). On one of the corners of this slot, there’ll be a tiny triangle. On your CPU, there’ll also be a small golden triangle on one of its corners. Being careful not to touch the CPU on either surface (only hold it by the sides), place the CPU in the slot, gold pins down, ensuring those triangles are pointing in the same direction.
Cooling Equipment
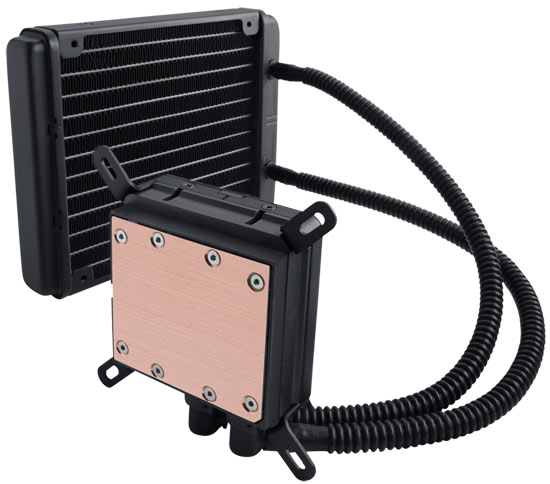
The next part to place in is your cooler. Some of you will have an air cooler, others will have water coolers. However, both of you will have a part of that cooler with a metal slab on it (refer to the image below). This piece of metal is going to rest on top of the CPU. First, get your thermal paste that would’ve come with the cooler (if not, you can buy from a tech store for fairly cheap) and make a small bead of paste on the surface of the CPU. This bead should be about the size of a green pea. On the motherboard, there’ll be screw slots in a square around where the CPU slot is. Line up the cooler with the CPU and the screw slots before lowering it. Afterwards, secure the cooler to the motherboard with those screw slots.
Chassis
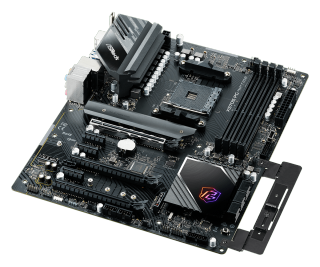
Next is the computer case, or chassis. You’ve now installed the CPU, and its cooler, to the motherboard, so it’s time to attach those to your chassis. Carefully remove the side panel (it will always be the panel on the left side of the chassis) and place the case on its side. Place the cover that comes with your motherboard into the rectangular hole on the side, with the audio-jack slots closer to the base of the chassis. Inside the chassis, there’ll be space to place your motherboard (refer to the image below). In every chassis, there will be pegs that you must put your motherboard on. On some motherboards, one or two of those pegs will be raised. If it is raised, you do not need to screw it and can instantly lower your motherboard into it where it will click in. From there it can act as a pivot to align the motherboard with the other pegs. Once you have aligned your motherboard, screw them all down. If you have a water cooler, you might want to place in the radiator first if the design makes it easier to do so that way. I recommend searching through YouTube if you need help with installing the radiator.
Graphics Card
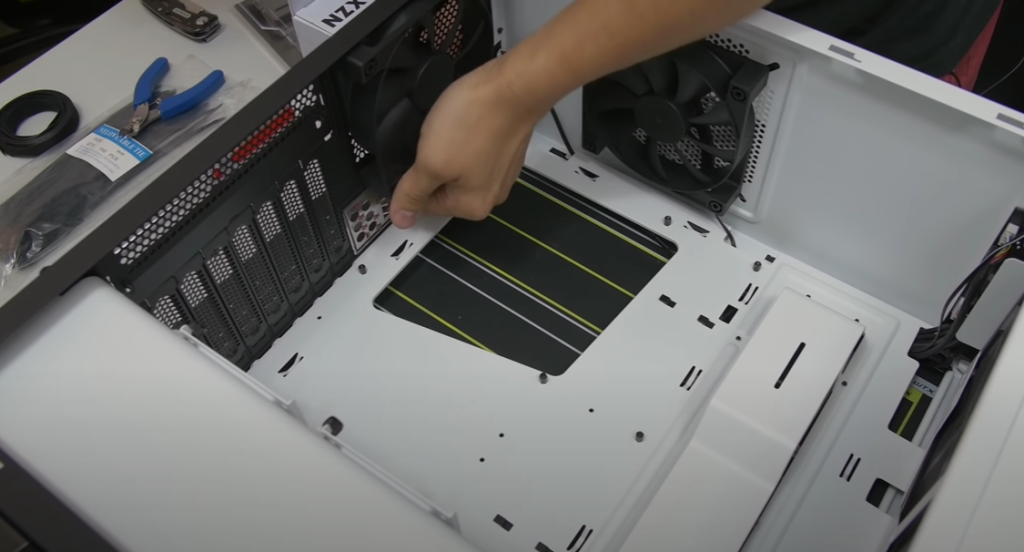
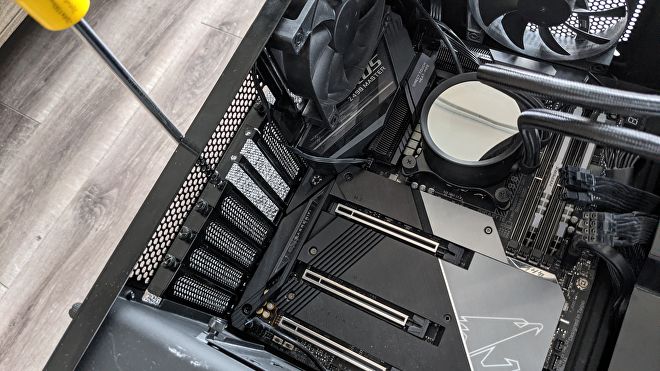
Installing your Graphics Card is next, and surprisingly easy. On your motherboard, there is a slot around the middle of the board. To the left of this slot, below the cover, there should be removable sheets of metal (refer to the image below). The left side of your GPU will also have similarly shaped sheets of metal, but with ports for HDMIs and display cables in them. Remove as many sheets from the chassis as seems necessary before sliding your GPU into the slot on the motherboard. Make sure that you line up which sheets you remove with the slot. Often, the top sheet is not actually one you need to remove. The last thing to install now is your Power Supply. Depending on the case you bought, you will have a basement at the bottom of the chassis. Stand the case upright, so that the Motherboard is facing forward. On the backside of the Chassis, you should see the ports on the side of the motherboard and, below that, the ports on the side of the Graphics Card. If you go further down, there will be a slot. Different cases will have different ways to install your PSU but they will all go here. Refer to the instructions provided by the case manufacturer if you require assistance there.
Storage
The last steps in installing your computer are the cables and the storage. If this is your first build, you likely have either a Hard-Drive (HDD), or Solid-State Drive (SSD). Different chassis will have different locations but the common rule is either a Drive Tower or wall slots. A drive tower is simply a tower with drawers designed to allow you to place HDDs and SSDs in it. It is semi-mobile but must be placed towards the bottom of the chassis. You will rarely find a drive tower overhanging anything. Wall slots are much more dynamic in location, but can only fit SSDs. They will be small walls that you can screw your SSD to and attach to the inside of the chassis. Should you be unable to find a place for your HDD or SSD, you can place it on the roof of the basement – Although, it is highly preferable that you find a way to lock your storage in place.
Wire Management
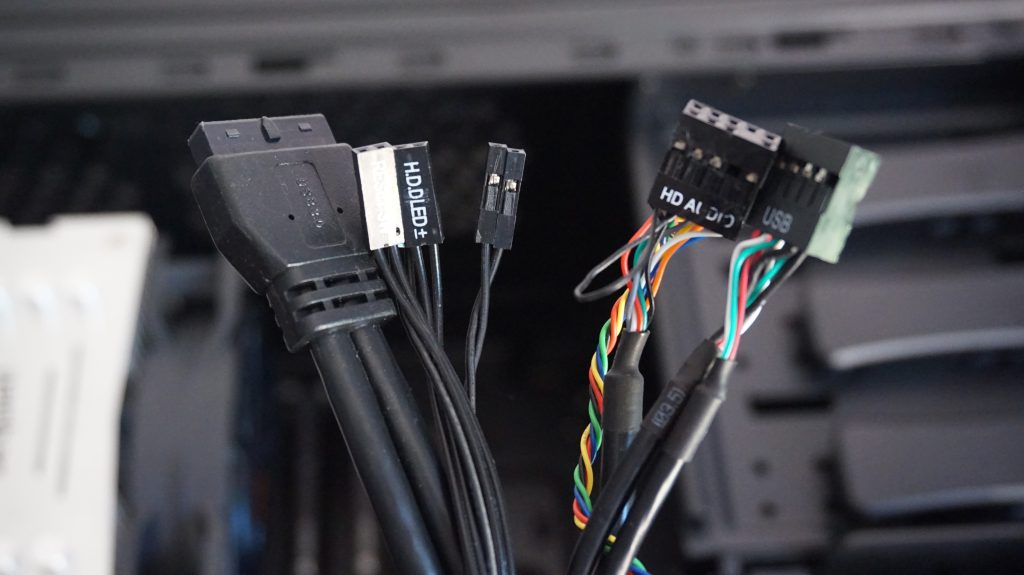
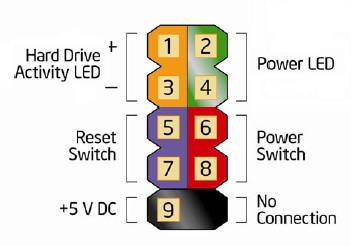
The last necessary step to building the computer is placing in the veins of your computer. Your wires. You may have noticed a few wires coming from the top-front of the chassis. These wires will be the on/off button, and the restart. If you also have HDMI or USB slots at the front of your chassis, there will also be wires for those. Please refer to both images below to understand which wires are which, and where they will plug in to your motherboard.
Software
The next step is to install your software. Before you go ahead and buy your new windows account, make sure the computer turns on by connecting a monitor. When it does, you will go to a mostly black screen with some white text on it. Depending on the country you are in, the exact appearance may be different but they are broadly the same. Once you are on this screen, go to your old computer (perhaps a laptop) and download a free version of Windows. This will be easier than buying Windows before installation. Place this new free version of Windows into a USB which you can then move over to your new build. Make sure you attach a keyboard to your new desktop and that the USB has no other files besides the free version of Windows. From there, press your boot-device selection menu key. To find out which key your computer is, check the manual of your motherboard. It is most likely to be F10, F12, or esc. From here, select the hard drive that has the same name as your USB. Clicking on this Drive will start the process of installing Windows. Once it is installed, you can sign into your internet and either create a new Windows account or attach your Microsoft account to it. To be able to customise the computer, you must buy a new Windows key. Unfortunately, even if you have bought Windows in the past and sign in with your Microsoft account, you must buy a new Windows key to be allowed to customise the computer. At least, though, you can do this at any point without risk of losing anything that you have saved to the new computer.
You may have noticed that throughout this article so far, I have not specified or recommended any parts. Certain parts of a device require different compatibilities to be able to work together. A diagram shown below represents these compatibility connections. As an example, you cannot use an Intel CPU on a motherboard designed for Ryzen CPUs or that is designed for a different version of the Intel CPU connection. In my opinion, Ryzen is better in terms of CPU choice for a multitude of reasons. Ryzen is cheaper than Intel, their CPUs have also become higher quality than Intel’s in recent years, and their connections to motherboards have backwards compatibility – an older version of a Ryzen port can still be used by newer model Ryzen CPUs. This compatibility does not go both ways – an older Ryzen CPU cannot use a new port version – but it is the most cross compatible any CPU company has been so far. You will need to do your own research to find which motherboards work with Ryzen CPUs as that would lengthen this article into the territory of novels. RAM sticks will work with pretty much any motherboard but make sure that the cooler you’re using does not impede on where those RAM sticks go. Similarly, make sure that the chassis you buy is the right size for the motherboard you get. If you buy a larger MoB, you will need a half-chassis or full chassis. A compact chassis can only work with smaller MoB sizes. If you’re wondering where to start your research for part compatibility, you can check this website.

For your own ease, here is a summary of the process: Install your CPU into the motherboard and then place in the cooler head, then place in your RAM sticks. After you’ve done that, install the MoB into the computer chassis. Next, place in the graphics card and power supply. Before you connect the wiring of the computer, install your long term storage. Then, make sure the front panel is connected to the motherboard. Lastly, install Windows and enjoy your experience.
If you need further assistance, watch this video by Bitwit. It is a guide to making your computer that will move at the same speed as you, for the most part.
Making a computer seems complicated, and takes a few steps, but once you know the parts and how they interact with each-other, it can become much easier to put them together and make your computer. I wish you luck!